Friday, August 25, 2006

Reverse applique paisley ............

Reverse applique paisley motif embellished:


with shapes cut from washing up cloths, beads, buttonhole stitch, seeding and french knots - ready to finish as a postcard.

Here's a close-up:


(Click on photos for bigger image)

Thursday, August 24, 2006

Motif in mola mode

Here's the next paisley motif, taken from the sketchbook page in the previous post.

This is synthetic washing up cloths (much cheaper than felt and they come in a variety of textures), in cut back or reverse applique. Machine stitched in straight stitch to hold it together and ready for embellishing.

Size is again postcard size, 6 x 4. This is such a handy size for these little experiments.


(click on photo for bigger image)


Messing around with motifs........


Sketchbook pages of paisley-based motifs.

Wednesday, August 23, 2006

Paisley postcard finished


I reverted to Plan A and made it into a postcard. I couldn't resist adding more embellishment, of course. Adding the orange french knots to the laid work in the yellow motif drew the eye straight to the top left hand corner, so I added some more orange to the larger motif to balance it up and then I thought it needed some beads. The background is stitched in chain stitch in dark blue and green, the different colours don't show up well in the photo. I zigzagged it to a piece of craft vilene (pellon), then covered the edge and the stitching in buttonhole stitch in the same colour as the laid work on the larger motif. There's been a slight departure from traditional crewel and I think the 'tail' on the yellow motif is an improvement. It turned out to be a difficult shape to satin stitch round smoothly without a break.

Here's a close up:


(click on photos for bigger image)

Tuesday, August 22, 2006

Her trouble is she doesn't know when to stop........


it just keeps growing!

It's postcard size, 6" x 4"

(click on photo for bigger image)

Monday, August 21, 2006

Playing with paisley


I was inspired by all the paisley motifs and couldn't wait to try one out. I was saving this little piece of linen for a postcard, but I've since found some other pieces of dyed fabric that I think would be better, so off I went to experiment. First thoughts were rich colours and richness of design. I decided to do my first attempt in old fashioned crewel embroidery. When I'm using a fabric with a pronounced weave and a fairly intricate design that is not counted, I like to draw the design on a piece of synthetic organza, then cut it away close to the stitching when its finished. The medieval embroiderers working on Opus Angelicum used silk gauze underneath their intricate pictures of saints etc. I copied them but I used a cheaper alternative! I'm not best pleased with this, especially the satin stitch on the 'tail' of the teardrop and the soft shading was more difficult than I thought it would be. Clearly I need to brush up on my crewel work.

I'm still thinking about the 'paisley sampler' - deciding whether it should be lots of paisley motifs worked in different stitches and colours in stranded cotton with embellishments, or whether it should be lots of paisley motifs worked in different techniques. Maybe I will do both. And then there will be the 'experimental work'! I do like to take a theme like this and 'work it to death'.

Here is a closeup:

(click on photos for bigger image)

Friday, August 18, 2006

Bitten by the paisley bug.............

It had to happen. All those posts on paisley made me think of the motifs on the first page of my sketch book on carpets. So I got it out (well, down actually, from a very high, very dusty top shelf, quite inaccessible really but it was more interesting than doing the ironing). Then I found a small piece of linen and I plan to make a Paisley Postcard. Then I also found a nice long strip of the same linen, so now I plan to make a Paisley Sampler too!

Here's a reminder of the design work I will be using.


Where are all those posts on paisley? Well, with Jo, in New Zealand, of course.

http://nzjo.blogspot.com/

Go have a look. Join in!

Thursday, August 17, 2006

What do you do with the ones that didn't work?

Easy, experiment on them. First of all, zap them with a heat gun.


Then further assault them with:

eyelets (ouch)


or smear them with puff paints


(click on photos for bigger images)

'What next?' you may ask. No idea. Sequins and beads for number 1 perhaps, and metallic paints for number 2 maybe.

Sunday, August 13, 2006

Tip of the week..........

and shame on me!


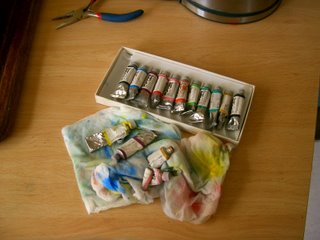
People, always wipe the tops of your paint tubes before you put the cap on...

Yeah, I know, we've all seen poor Vincent with his ear in a sling, driven to paint, surrounded by oozing paint tubes, all with the tops off. NO! That stuff costs money!

I spent an hour today sorting this lot out! If your tops are a little reluctant to come off, dip the tube, cap end, in a basin of very hot water (if you can put your finger in its not hot enough). This will soften the plastic cap just enough so you can GENTLY remove it.

Tip number 2. NEVER lend your paints to your daughter!

Friday, August 11, 2006

Postcard......July was hot...........

and we spent most of our free time on the beach, often with the grandchildren, Maisie 6 and Joe 5. We bought them inflatable plastic surfboards. These surfboards were a huge success, they just wouldn't stay out of the water. We made them wear armbands, in case they went too far out and fell off. (The armbands are not 'life preservers' but they do make them more visible and give you a chance to get to them). Instead of using the inflatables as surfboards, they lay across them and kicked out with their legs. They got up to quite a speed, and with the coloured inflatables, plus the armbands, they looked like brightly coloured insects whizzing across the top of the water.

I wanted to be sure I remembered, so I made a postcard! Here it is,
entitled 'Joe's Heroic Rescue'

(click on photo for bigger image)

Maisie was busy kicking away, and when she looked up, she found herself face to face with a seagull! She looked around, discovered she could no longer touch the bottom and realised she had gone too far out. She started shouting but that quickly turned to crying and Joe immediately launched himself out on a rescue mission. His little legs go really fast and he soon reached his sister and began to push her back in with his own inflatable. They were quite safe because there is a ring of rocks around that part of the beach, but the water was very cold and they had both been in for quite a while and Maisie was beginning to panic, so the end result was that poor long-suffering Grandad had to jump in and push them both to shore.

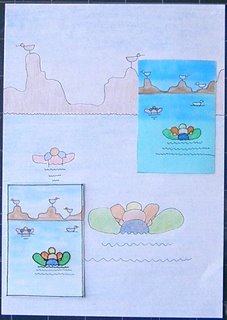
The postcard was about children, so I wanted a simple, childish style. The original sketch is in the background, with two versions of the postcard.

Both postcards are on craft vilene (pellon). The top one was sunprinted with silk paints. I cut out the shapes of the rocks and the children in paper, laid them in position on the painted vilene and put it oustide in the sun. Then I coloured it in with water colour dyes and outlined with a fine tipped permanent marker. The bottom one was coloured with water colour dyes and outlined with a fine tipped permanent marker, then I outlined the figure in the foreground with whipped back stitch in fine crochet cotton.

Sunday, August 06, 2006

Fabric Postcard July - Finished


(Click on photo for bigger image)

Here it is finished. I decided not to bead the other letters. I like the contrast. Also its an experimental piece and I wanted to be reminded of how it looked at that stage. I made a sandwich with craft vilene (pellon) in the middle and a piece of felt on the back. Its not going in the post, so I didn't need to be able to write on it. I find satin stitching often looks a bit heavy, so I was looking for a different way to finish off the edges. I straight stitched a few rounds with metallic thread. Then, with a soldering iron I 'stitched' between the rows of straight stitching to fasten the top fabrics together and make a decorative pattern. Then I ran the soldering iron round the outside of the postcard. It only cuts down as far as the craft vilene so I finally cut it out with scissors. A quick touch of the soldering iron to any stray whiskers, and it was done.
Saturday, August 05, 2006

Fabric Postcard progress

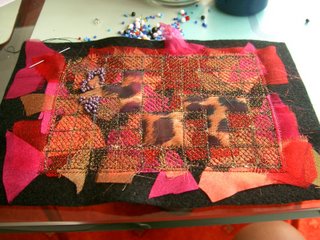
Overstitching finished. I got carried away and started beading before I took the photograph to show the unstitched letters. They stand out more than I thought they would.


Here, I've beaded the 'H', following the pattern on the printed chiffon. I'm tempted to bead the other letters, then zap it with a heat tool, but maybe I'll try that later on some scraps (the bits from the ones that went wrong!). Next, I have to put it onto a backing and finish the edge.


(Click on photos for bigger images)

Friday, August 04, 2006

Fabric Postcard - July

I've been wanting to take part in 6 x 4 Lives for some time, but somehow I couldn't fit it in. Now, for reasons explained later, I suddenly find that I have time! Here's the details.

http://inaminuteago.com/blog/index.php/6-x-4-lives/

I like the idea of a small sample each month. This is my first one and its really late, but I started it before the end of July.

This July was the hottest since records began. This postcard is to remind me of the heat, and also the heat inside me. On one of the hottest days of the year, I was fired because I went home with heat stroke. Suffice to say, I don't intend they should get away with it. That's why I didn't finish it on time - I've been a bit busy...........

So, my postcard is about HOT.

This is how I made it:

(click on photos for bigger image)


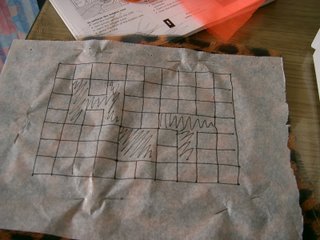
Design on squared paper.


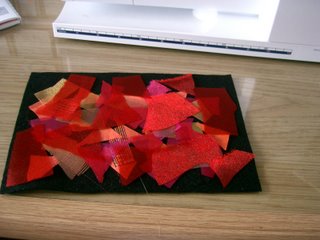
Scraps of crystal organza on felt.


Chiffon over the top.


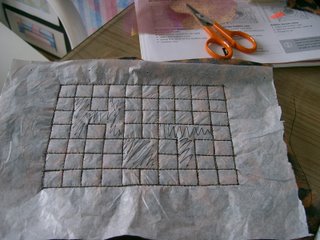
Design traced freehand onto pattern drafting tissue. Placed over the top of fabric and felt 'sandwich' and pinned.


Stitched in a grid pattern, leaving letters blank. I used metallic thread with a triple straight stitch.


Cut away squares, leaving letters intact. Overstitch with automatic pattern, I used cross stitch. Once I've cut away all the squares and overstitched, I will be ready to EMBELLISH.